1. You can add your own questions to your quizzes. You can create various types of quiz questions, including individual questions.
2. In Course Navigation, click the ‘Quizzes’ link.

3. Click the ‘Add Quiz’ button.

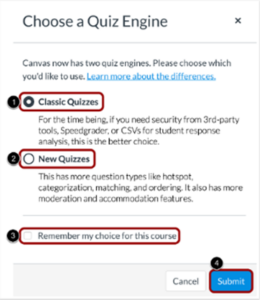
4. To create your desired type of quiz, select the ‘Quiz Engine’ option, which will give you the following choices:
• To create a classic quiz, click the ‘Classic Quizzes’ option one.
• To select New Quizzes, click the ‘New Quizzes’ option two.
• To save your quiz engine selection for this course, click the ‘Remember my choice for this course’ checkbox three.
• Then click the Submit button four.

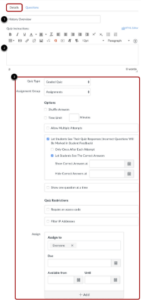
5. To edit your quiz, do the following steps:
• In the Details tab, enter the name of your quiz.
• In the Rich Content Editor, introduce your quiz with formatted text, images, video, or sample math equations. You can even use the media commenting tool to record an introduction to the quiz.
• Add the remaining details of your quiz as shown in the window opened to you.

6. To add questions to your quiz, click the Questions tab. Manually create a new quiz question by clicking the New Question button.

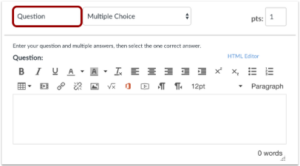
7. Quiz questions are not automatically numbered for instructors. To add a custom name to your quiz question, enter the name in the question text field. Custom names can help you to identify quiz questions more easily. Regardless of the question name, students always see quiz questions in numerical order (i.e. Question 1, Question 2).

8. To select your desired types of quiz questions, in the question type drop-down menu, select your choice.
![]()
9. To set the point value for the question, enter the points in the ‘pts’ field.
![]()
10. To save your question, click the ‘Update Question’ button.
![]()
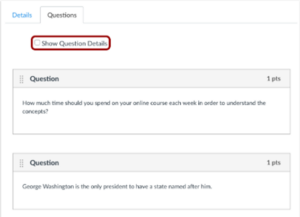
11. To view question details, click the ‘Show Question Details’ checkbox.

12. Click the ‘Save’ button to save your work and preview the quiz.
![]()
13. Click the Preview button to see what students will see when they take the quiz. If the preview shows the quiz the way you want it, click the Publish button.
